
Of all the makeshift shelters that have been developed and used by outdoorsmen, the debris hut is likely the most popular. This is so for several reasons. First and foremost, debris huts are exceedingly easy to build provided there are resources around you. Second, no matter what the temperature is, a well stuffed debris hut will protect you from the elements. In high temperatures it provides highly sought after shade, and in the winter it blocks drafts and traps body head. Finally, when built properly and in the right spot, debris huts are about as close to waterproof as makeshift shelters get. With all these great qualities, debris hut building is a skill that you really should consider adding to your outdoor repertoire. Use the following guide for details on how to make one yourself.
1. Finding a location
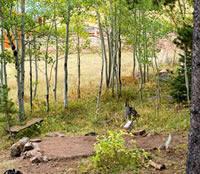 There are two big things to look for when finding a spot to fashion your debris hut. First, the landscape should be angled, so you can face the hut itself downhill. This will prevent water from rushing into your debris hut in case of inclement weather. The second quality of a good “hut spot” is that they lie in moderately wooded areas. This way, plenty of supplies for fashioning the hut will be close by.
2. Making the frame
A debris hut in the traditional sense is basically just an A-frame structure. To make the top of the frame, find the longest, sturdiest tree limb you can. Then, find a low lying Y split in a thick tree or a solid stump, and place the limb in it. The other end of the limb should be put on the ground and secured with rocks. Then, find many smaller limbs to construct the base of your walls. They should be placed vertically, at an acute angle to the ground, and rest on the base limb (The roof of the A-frame). Trim your vertical limbs so that they don’t rise far above that top limb.
3. Solidifying the structure.
Now that the basic triangular shape of your debris hut is laid out, it’s time to place a layer of branches (similar in size to the vertical ones) across the debris hut’s walls. They should be big enough to support the other debris that you’ll put on top, but small enough not to roll off the vertical limbs.
4. Adding the finishing layer.
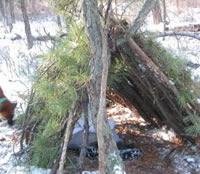 This final part is the easiest and most fun. All you need to do is grab armfuls of dead leaves and twigs from the ground and place them on top of you skeletal structure. Pack them down as tightly as possible, only finishing when you’re sure the hut can withstand any local weather conditions you expect.
With that, your quick and (relatively) painless debris hut is complete. Try not to stand around too long admiring your creation, though. Daylight is fading fast – and you likely have a big day of outdoor adventures ahead of you.
Image Credits
- Location for shelter: http://www.beavermeadows.com
- Debris hut: http://www.njpinelandsanddownjersey.com/